No-Bake Pumpkin Cheesecake Bars: The Perfect Fall Dessert
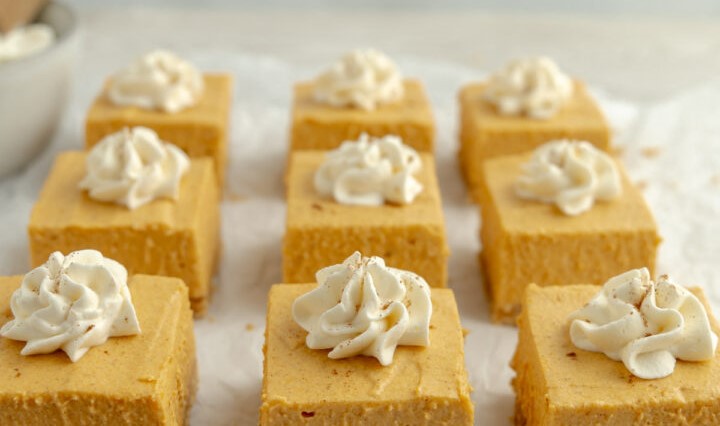
No-bake pumpkin cheesecake bars are the ultimate dessert for pumpkin lovers, combining the creamy richness of cheesecake with the warm spices of pumpkin pie, all in an easy-to-make, no-bake form. Perfect for fall gatherings, Thanksgiving, or any time you’re craving a pumpkin treat, these bars are a crowd-pleaser that requires minimal effort. In this guide, we’ll cover everything you need to know about making no-bake pumpkin cheesecake bars, from the ingredients to a step-by-step recipe and helpful tips for a flawless dessert.
| Recipe | No-Bake Pumpkin Cheesecake Bars |
|---|---|
| Prep Time | 20 minutes |
| Chill Time | 4 hours (or overnight) |
| Total Time | 4 hours 20 minutes |
| Servings | 12 bars |
Ingredients
| Ingredient | Amount |
|---|---|
| Graham crackers or ginger snaps | 1 1/2 cups, crushed |
| Unsalted butter, melted | 1/4 cup |
| Cream cheese, softened | 16 oz (2 blocks) |
| Pumpkin puree | 1 cup |
| Powdered sugar | 1 cup |
| Whipped topping (or whipped cream) | 1 1/2 cups |
| Pumpkin pie spice | 1 1/2 teaspoons |
| Vanilla extract | 1 teaspoon |
Instructions
| Step | Instructions |
|---|---|
| 1 | In a medium bowl, combine crushed graham crackers (or ginger snaps) with melted butter. Mix well. |
| 2 | Press the mixture firmly into the bottom of a lined 9×9-inch pan to create the crust. Chill in the fridge. |
| 3 | In a large bowl, beat the softened cream cheese until smooth and creamy. |
| 4 | Add pumpkin puree, powdered sugar, pumpkin pie spice, and vanilla extract. Mix until fully combined. |
| 5 | Gently fold in the whipped topping until the filling is light and fluffy. |
| 6 | Spread the pumpkin cheesecake filling evenly over the chilled crust. |
| 7 | Cover the pan with plastic wrap and refrigerate for at least 4 hours, or until the bars are set. |
| 8 | Once set, lift the bars out of the pan using the parchment paper, cut into squares, and serve. |
Notes
- Storage: Store in an airtight container in the refrigerator for up to 5 days. For longer storage, wrap bars individually and freeze for up to 3 months.
- Optional Toppings: Garnish with whipped cream, a sprinkle of cinnamon, or a drizzle of caramel before serving.
Outline
- Introduction
- Overview of no-bake pumpkin cheesecake bars
- Why they’re perfect for fall gatherings
- Why Choose No-Bake Desserts?
- Benefits of no-bake recipes
- Time-saving and beginner-friendly
- Key Ingredients for No-Bake Pumpkin Cheesecake Bars
- Breakdown of essential ingredients
- Explanation of ingredient roles and substitutions
- Choosing the Right Pumpkin
- Fresh vs. canned pumpkin puree
- How to make homemade pumpkin puree
- The Ideal Crust for Pumpkin Cheesecake Bars
- Types of crust options (graham cracker, ginger snap)
- Tips for making a firm crust
- How to Make No-Bake Pumpkin Cheesecake Bars
- Detailed step-by-step instructions
- Tips for achieving a smooth, creamy texture
- Vegan and Dairy-Free Alternatives
- Ingredient swaps for a vegan-friendly dessert
- Non-dairy options that maintain taste and texture
- How to Store and Serve Pumpkin Cheesecake Bars
- Storage tips for freshness
- Serving suggestions for presentation
- Customizing Your Pumpkin Cheesecake Bars
- Ideas for toppings and mix-ins
- How to make the bars festive for holidays
- Common Mistakes to Avoid
- Tips for avoiding common cheesecake mishaps
- Solutions for texture and flavor issues
- Perfect Pairings for Pumpkin Cheesecake Bars
- Beverage and dessert pairing suggestions
- Seasonal options that complement pumpkin flavor
- Health Benefits of Pumpkin
- Nutritional perks of pumpkin
- Health benefits of pumpkin spice ingredients
- Frequently Asked Questions
- Common questions about no-bake pumpkin cheesecake bars
- Recipe Card
- Table format recipe for easy reference
- Conclusion
- Final thoughts on making pumpkin cheesecake bars
- Encouragement to try making them at home
Why Choose No-Bake Desserts?
No-bake desserts are a lifesaver, especially for busy home cooks or those who want a quick and easy treat without needing an oven. No-bake recipes are also ideal for warmer days or when your oven is tied up with other dishes. No-bake pumpkin cheesecake bars, in particular, offer all the flavors of pumpkin pie and cheesecake but with less hassle and time. Simply prepare, refrigerate, and enjoy—no baking required.
These bars also retain a creamy, smooth texture since they set in the refrigerator, giving you a luxurious dessert that feels as indulgent as a baked cheesecake.
Key Ingredients for No-Bake Pumpkin Cheesecake Bars
To create the perfect no-bake pumpkin cheesecake bars, you’ll need a few staple ingredients. Here’s a look at the essential components and what they contribute to the dessert:
Main Ingredients
- Cream Cheese: This gives the cheesecake its rich, creamy texture. Use full-fat cream cheese for the best results.
- Pumpkin Puree: The star of the show, pumpkin puree provides a natural sweetness and a classic fall flavor. Canned pumpkin works well, but ensure it’s pure pumpkin, not pumpkin pie filling.
- Graham Crackers or Gingersnaps: These crushed cookies form the base of the crust. Gingersnaps add a spiced kick, while graham crackers offer a mild, classic flavor.
- Butter: Melted butter helps bind the crust together, making it firm enough to hold the cheesecake filling.
- Whipped Topping: Adds lightness to the cheesecake mixture, making it fluffy and easy to set in the fridge. You can use store-bought whipped topping or homemade whipped cream.
- Pumpkin Pie Spice: A blend of spices, including cinnamon, nutmeg, and cloves, which brings warmth and depth to the pumpkin flavor.
- Powdered Sugar: Sweetens the filling without adding a gritty texture, as granulated sugar might.
Optional Add-ins
- Maple Syrup or Honey: For extra sweetness and flavor.
- Vanilla Extract: Adds richness and enhances the cheesecake’s flavor.
- Salt: Just a pinch to balance the sweetness.
Chocolate Espresso Bars
Chocolate espresso bars combine the richness of chocolate with the bold flavor of espresso, creating a treat that satisfies your sweet cravings and gives you a boost of energy. These bars are perfect for an afternoon pick-me-up, a dessert after dinner, or even as an on-the-go snack to keep you fueled throughout the day.

Choosing the Right Pumpkin
For these cheesecake bars, pumpkin puree is the key ingredient. Both canned pumpkin and homemade puree work well, though they offer slightly different textures. Canned pumpkin is smooth and convenient, while homemade puree can be more flavorful but may require extra straining to remove excess moisture. For homemade puree, simply roast or steam pumpkin, blend until smooth, and strain.
The Ideal Crust for Pumpkin Cheesecake Bars
A good crust sets the foundation for these bars. Graham cracker crusts are traditional and offer a mild, buttery flavor that complements the pumpkin filling. For a twist, try using ginger snaps for a spicy, aromatic crust that pairs beautifully with pumpkin.
- Graham Cracker Crust: Combine crushed graham crackers with melted butter and press into the pan for a classic, mild flavor.
- Gingersnap Crust: Adds a spicier kick to the bars, enhancing the fall flavors.
For best results, press the crust firmly into the pan and chill it briefly before adding the filling.
How to Make No-Bake Pumpkin Cheesecake Bars
Creating these bars is simple and straightforward. Here’s a step-by-step guide:
Ingredients
| Ingredient | Amount |
|---|---|
| Graham crackers or ginger snaps | 1 1/2 cups, crushed |
| Unsalted butter, melted | 1/4 cup |
| Cream cheese, softened | 16 oz (2 blocks) |
| Pumpkin puree | 1 cup |
| Powdered sugar | 1 cup |
| Whipped topping (or whipped cream) | 1 1/2 cups |
| Pumpkin pie spice | 1 1/2 teaspoons |
| Vanilla extract | 1 teaspoon |
Instructions
- Prepare the Crust: In a medium bowl, combine crushed graham crackers (or ginger snaps) with melted butter. Stir until well mixed. Press the mixture firmly into the bottom of a lined 9×9-inch pan. Chill in the fridge while preparing the filling.
- Make the Filling: In a large mixing bowl, beat the softened cream cheese until smooth and creamy. Add pumpkin puree, powdered sugar, pumpkin pie spice, and vanilla extract, mixing until fully combined.
- Fold in Whipped Topping: Gently fold in the whipped topping until the filling is light and fluffy. Be careful not to overmix.
- Assemble the Bars: Spread the pumpkin cheesecake filling evenly over the chilled crust, smoothing the top with a spatula.
- Chill: Cover the pan with plastic wrap and refrigerate for at least 4 hours, or until the bars are set and firm.
- Slice and Serve: Once set, lift the bars out of the pan using the parchment paper, cut into squares, and serve. Enjoy with a dollop of whipped cream or a sprinkle of cinnamon if desired.
Vegan and Dairy-Free Alternatives
To make these bars vegan or dairy-free, replace the cream cheese with a dairy-free or vegan cream cheese substitute. Swap out the whipped topping for a coconut-based whipped topping, and ensure that your butter replacement is plant-based, like coconut oil or vegan margarine. These substitutions will give you a vegan-friendly version without sacrificing taste or texture.
How to Store and Serve Pumpkin Cheesecake Bars
Store these bars in an airtight container in the refrigerator for up to 5 days. They also freeze well; simply wrap each bar individually in plastic wrap and store in a freezer-safe bag for up to 3 months. To serve, allow frozen bars to thaw in the refrigerator for a few hours before eating.
For serving, try adding a sprinkle of extra pumpkin pie spice or a drizzle of caramel sauce. These bars are also delicious with a cup of coffee or tea, making them a cozy, fall-perfect dessert.
Customizing Your Pumpkin Cheesecake Bars
Want to add a personal touch? Here are some fun ideas:
- Swirl in Caramel or Chocolate: Add dollops of caramel or chocolate syrup to the filling and swirl with a knife for a marbled effect.
- Top with Pecans or Walnuts: For extra crunch, sprinkle crushed pecans or walnuts on top before serving.
- Sprinkle with Sea Salt: For a sweet and salty combo, add a light dusting of sea salt over the top.


